HOW TO SCAN IMAGES OF YOUR ITEMS
This section will guide you through the basics of taking images of the items you wish to sell. Images are important to help you sell your items, because collectors are very particular about what they buy. They will want to view your item in as much detail as possible in order to make their purchasing decision.
Don't be intimidated by the length of this page, and don't be afraid to skim or skip ahead. We believe too much info is better than not enough, and you can trust that once you get started, scanning your items will not be difficult. No matter how old or young you are, and no matter how limited your computer skills may be, this section should get you up-and-running in no time!
EQUIPMENT
 A flatbed scanner is the most effective tool for acquiring an image of a comic book. We encourage sellers not to use a digital camera to take images of individual comics, because photos do not show enough close-up detail for most buyers. However, ANY image is better than NO image, so if you do not have access to a flatbed scanner, digital photos will suffice.
Small, lightweight scanners can be purchased for as low as $50, and bought from retailers such as Best Buy, Circuit City, Staples, Office Depot, Target, Walmart, Sam's Club, Amazon.com and many others.
Popular scanner brands include Canon, HP, Epson, Microtek, Lexmark and many more. Some of Canon's Canoscan LiDE series offer nice options at affordable prices. Many manufacturers also sell combination printer/scanner/fax/copiers.
If you're planning to scan numerous "slabbed" comic books (encased in the large plastic holders of 3rd party graders), you may wish to consider purchasing a bigger scanner that will fit the entire item on the scanning bed surface. These scanners are harder to find in stores, but generally cost upwards of $280 and can be purchased online. ComicConnect recommends the Microtek ScanMaker i800, which has a scan bed area of approximately 14" x 8 ¾". We'd also love to hear from sellers who've had positive experiences using other large-sized scanners.
The scanner will also come with an installation CD, which usually includes "control panel" software from which you can initiate and save scanned images.
IMAGING SOFTWARE
After scanning your item, you may wish to crop or resize the image, or match the color-levels to accurately reflect the book's true appearance (and let us put heavy emphasis on the word accurately). It is possible that your scanner's control panel software, or other pre-packaged software that came with your scanner, may give you enough options where you don't need additional software. Nevertheless, here are some choices:
The gold standard of all programs for both PC and Mac is called Adobe Photoshop. If you own it, or have access to it, you're all set. If you don't want to spend $$$$ to acquire it, you can download a free Trial or sign up for their "Cloud" service.
Adobe Photoshop Elements is a barebones version of Photoshop, which can be purchased for $$$. You may even be able to download a free, 30-day trial before purchasing it. Like Photoshop, it is available for both PC and Mac.
Let it not be said these programs are the only game in town. There are countless, inexpensive, off-the-shelf programs and downloads that can also provide you with the tools you may require.
THE BASICS
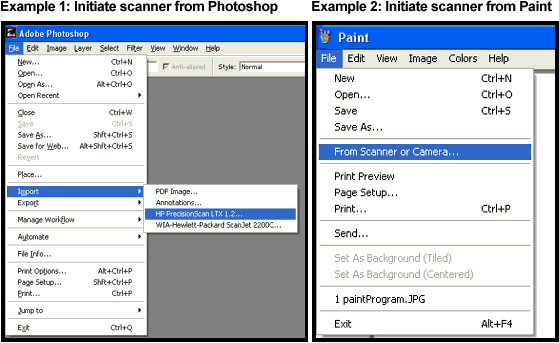
Besides using your scanner software's control panel to initiate scanning, some of the imaging software programs mentioned above will let you launch the scanner directly from inside the program itself.
Cropping your image
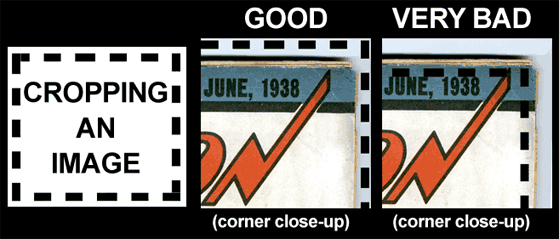
You may wish to "crop" your image, thereby eliminating excessive borders and highlighting only the item you want to sell. Generally, this is done with a dotted-square rectangle, usually called a Marquee Tool. Some scanning software allows the user to "crop" a preview scan before saving a final scan. Other times, you may wish to crop the image from your imaging software by copying and pasting the selection into its own new document. The commands for copy, new and paste can be found under File and Edit at the top of most software programs.
When cropping a comic book image, you must be careful to leave enough border to show the complete edges of the comic. The condition of the edges is a key factor for buyers, and if this visual information is trimmed off in your image, buyers are likely to return the item and ask for their money back.
Saving your image
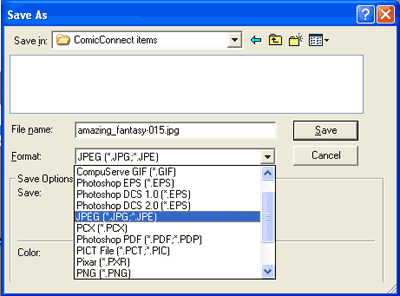
The image for every item must be saved as a JPEG, which is a file format ending in .JPG. If you have an image file in any other format, you must resave it as a JPEG.
The example below is what a "Save As" dialogue might look like, and how you would choose the correct file format of JPEG before saving the image.
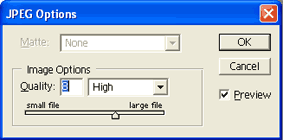
When saving a JPEG image, you're generally given the option to choose the file's image quality on a scale of 1 - 12. Start by going for the highest image quality possible. If you find the saved file size is too big, try a lower setting.
EXTRA CREDIT
What is DPI? DPI stands for "dots per inch", and is a setting that represents how many dots (or pixels) of color comprise each square inch of your image. As a metaphor, picture each stitch on a needlepoint image, or each peg on a Lite-Brite board. Typical DPI settings are 72 dpi, 150 dpi and 300 dpi (or pixels/inch). Because the Internet relies upon speed to transfer and display images, most websites including ComicConnect customarily use images that are 72 dpi.
If your imaging software allows it, you may wish to scan your images at a high resolution to capture as much detail as possible, and then resize the image to 72 dpi. Photoshop, for example, not only allows you to change the settings of pixels per inch, but also lets you specify how many total pixels wide your image is. ComicConnect recommends a width of 900 pixels to give buyers a good sized image to look at.
Save for Web
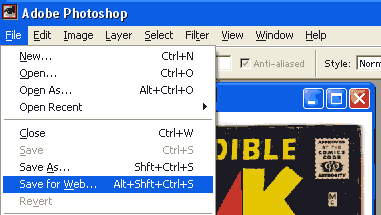
Another great tool for Photoshop users is the option called "Save for Web" in newer versions of the software. Instead of using the typical "Save" function, Save for Web creates JPG images optimized for websites by cramming as much detail as possible into small file sizes conducive for web delivery.
Auto Levels & Auto Contrast
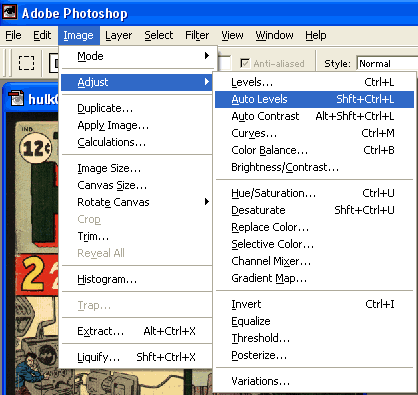
Sometimes the reflective light of the scanner bulb can cause your comic book to look faded or wash-out. In Photoshop, the options of Auto Levels and Auto Contrast generally do a good job of matching the image more closely to the real-life appearance of your item.
A word of warning
Resist the temptation to doctor your image too much! If you start blasting away at the contrast settings and color levels of your image to make it look better than it actually is, your actions will NOT go unnoticed. Not only will buyers return the items before you are paid for them, you'll end up wasting their time, ComicConnect's time, and your time. Keep it honest.
Black & Yellow Covers
Scanned images of comic books with yellow or black covers are often the most off-base. This is because of the respective reflective and non-reflective nature of these colors, and how they interact with the scanner light. Playing with the image's lightness/darkness, contrast and color-levels can help to make your image more representative. Just be careful not to go too far -- or you'll end up offsetting other important colors on the cover.
Glare from 3rd Party Grader Holders
The holders of "slabbed" comic books sometimes create unnecessary glare that obscures your scanned item's true appearance. To reduce this effect, make sure very little light is getting in from outside the scanner. Make sure the scanner cover is closed (to the extent possible), and that there aren't any bright lights shining on the scanner. You may even try covering the scanner lid with a dark, dense cloth while making the scan.